Getting Started
Activating the plugin
- Open Edit → Project Settings → Plugins → Custom Tone Mappers.
- Check Enabled.
- Restart the editor.
- In Edit → Project Settings → Plugins → Custom Tone Mappers, choose a tone mapper from the Tone Mapper dropdown.
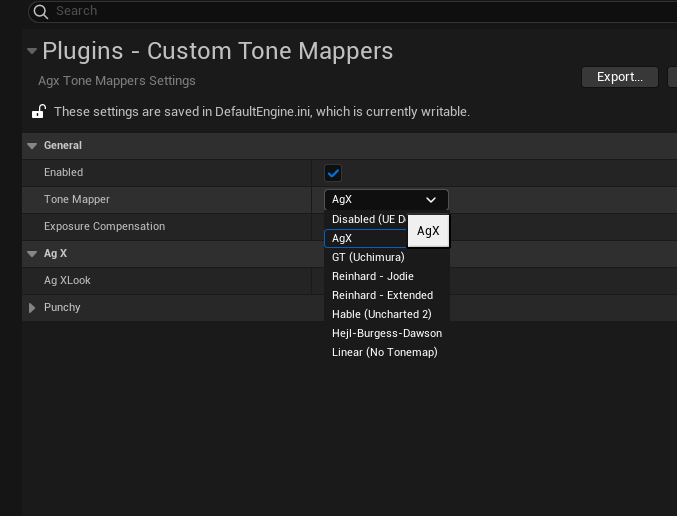
Changes take effect immediately in the Editor viewport and in PIE — no restart required.
Choosing your first tone mapper
If you're not sure where to start, try AgX (Default look). It's the most color-science-sound option and produces natural, photographic results in most scenes.
For a quick comparison workflow:
- Open a scene with bright lights or emissive materials (high contrast is where differences are most visible).
- Cycle through the Tone Mapper dropdown and compare.
- Use Exposure Compensation to adjust overall brightness if needed.
The Linear mode (no tone mapping) is very useful for debugging: if Linear looks correct but another mode looks wrong, the issue is in the tone curve parameters, not in your scene lighting.
Exposure Compensation
Exposure Compensation (in stops) is applied to the scene color before the tone mapping curve. It works identically across all tone mappers.
| Value | Effect |
|---|---|
0.0 | No change (default) |
+1.0 | 2× brighter input |
-1.0 | 2× darker input |
+2.0 | 4× brighter input |
This is separate from UE's own exposure/auto-exposure system. The two stack multiplicatively.
Per-tone-mapper settings
Some operators expose additional parameters that appear in Project Settings when that operator is selected. See the individual pages for details:
- AgX — Look preset
- GT (Uchimura) — 6 curve parameters
- Reinhard – Extended — Max White point
- Hable (Uncharted 2) — 8 curve parameters
Reinhard – Jodie, HBD, and Linear have no additional settings.
Disabling the plugin
Setting Tone Mapper to Disabled (or unchecking Enabled) restores the default UE tonemapper with no performance cost — the plugin's render pass is not injected at all when disabled.